Photo of "my-go to vanilla cake". Cake is frosted with white frosting on the top and sprinkles. The sides of the cake are naked and it sits on a grey plaid plate on a wood base.
Cookbook Reviews

Bake Your Heart Out

Cookbook By: Dan Langan

Photo of the cover of bake your heart out cookbook

“This is the real magic of baking. It gives you a feeling of fulfillment and accomplishment unlike anything else I’ve found. I may have an endless to-do list, but if I can sit down with my family on Sunday and share a dessert that makes them groan with pleasure or drop off a batch of cookies to someone having a hard time, I can go to bed knowing it was a good day,” Dan Langan. 

Bake Your Heart Out was gifted to me by the publisher and from the moment I opened the package I was hooked. I couldn’t wait to sit down and read the whole cookbook. It is filled with recipes that tempt me to just eat dessert for every meal of the day! 

I had a hard time narrowing down which recipes to try for my review but settled on the ones below to get a good feel for the different types of recipes Bake Your Heart Out offers. Read on to see how they came out and what I thought (spoiler: loved it all). 

Photo of 4 cheese danish twists on a white plate sitting on a wood tray against a tan wall.

Cheese Danish Twists

I have always had a secret love for cheese danishes. When I am out an about and a cafe offers them it is my go-to order but I’ve never been brave enough to make them at home. I saw this recipe in Bake Your Heart Out and was really drawn to it – it seemed like it would be really involved but not difficult. 

The recipe for the cheese danish twists was extremely detailed, which is necessary when making something like this. It was very clear on what steps needed to be done the day before and which steps on the next day when you are baking them. The first day to prep the laminated dough and filing it took me about two hours in total, especially since I kept stopping to read and reread the directions as I didn’t want to mess anything up. One important thing to remember is that you need some counter space to work with – I don’t have a lot of that so I used my pastry mat on my kitchen table which worked really well. 

On the second day it only took me about a half hour to prep the dough to get to the stage of being able to let it rise. You would have been laughing if you had seen me trying to get the greased plastic wrap onto the danishes. It was definitely a comedy of errors as it wouldn’t stop folding over on itself and since I was alone it took a few tries to get it set. The danishes do have to rise for 60 to 90 minutes before baking, so don’t forget to plan that in your timetable. Right before baking you have to brush the dough with the egg wash while avoiding the filing and parchment paper – I did my best to avoid them but did find that I was getting a little bit of the filling on my brush. I had a paper towel in my hand and just wiped off my brush anytime I got any filling on it – it seemed to work pretty well. 

I was really excited when I put my first batch in the oven, as you can only bake on sheet pan at a time. When I went to turn them around, I realized I didn’t do a good job of pinching the dough, so the tails started to come out. It was helpful to know this, so I was able to go over the second sheet pan of cheese danish twists and make sure that the ends were pinched really well. When I baked the second sheet all of the ends stayed pinched. 

The house smelled so good when these were baking and I couldn’t wait to eat one. I was really happy with how they turned out. The cheese danish twists were delicious! Did they look perfect? No, but that doesn’t matter to me – I love the imperfectness of homemade desserts. These are the perfect thing to make for a brunch and will definitely impress your family and friends. I will for sure make them again for special occasions – they take a little too much time for me to make them on a regular basis.

Photo of "my-go to vanilla cake". Cake is frosted with white frosting on the top and sprinkles. The sides of the cake are naked and it sits on a grey plaid plate on a wood base.

My Go-To Vanilla Cake

When it comes to vanilla cakes I can be really picky – my favorite ones are always from Publix (the grocery store) bakery. I read through this recipe in Bake Your Heart Out and knew I wanted to try it to see how good it tasted. The recipe was very simple and easy to follow. Just remember you have to have the eggs, buttermilk and butter at room temperature. I did have to pick up buttermilk and some cake flour, you can get the cake flour at most grocery stores. 

Currently I don’t have a stand mixer so I made this using my hand mixer with the regular beaters and it worked fine. Just make sure you are keeping track of the time as you never want to overmix batters. It took about 15 minutes to get the cake ready for the oven. 

Mine took the full 50 minutes to be done as Dan described in the recipe. Now, here comes the one tip that in all my years of baking I have never heard of and neither has anyone I asked. He says to take a piece of parchment paper and place it over the top of the baked cake and gently press down to level the cake while it’s still in the pan. I was shocked that it worked and even more shocked that I never heard of this before! 

The cake was so moist and delicious – it was just as good three days later as it was the first day. Also, I don’t have an airtight storage container for my cakes, so I just put the cake on a plate and use a giant bowl I have to cover it – works perfectly. 

Simple Vanilla Buttercream

A picture of "my go-to vanilla cake" slice. Photo is taken from the side showing the inside of the cake and the white frosting on top with colored sprinkles. Cake is on a white and blue fish themed plate.I learned how to make homemade frosting when I was young, so I wasn’t scared of trying this recipe. The recipe for the simple vanilla buttercream was very easy to follow. You do have a choice to use either buttermilk or milk, I used buttermilk since I had it on hand. 

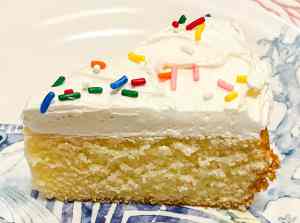
Once again, I used my hand mixer since I do not currently have a stand mixer, it worked just as well. I paid close attention to the time and consistency of the buttercream during the process. Yes, my arm was a little tired after holding the hand mixer for so long, but this vanilla buttercream was totally worth it. You can see by this picture how much buttercream the recipe made – I loved it as I don’t think there can ever be too much frosting. 

I’m not sure what the magic trick is in this recipe, but I have never had buttercream stay so soft, normally it gets hard as the days go by but on day 3 the buttercream was just as soft as the first day. I couldn’t believe it! Plus, I cannot express just how tasty this vanilla buttercream is. I plan to use this as my go-to frosting going forward and I am going to make the chocolate version soon. 

Cookbook Ratings: Recipe directions easy to follow: yes, Ingredients easy to find: yes, Specialty ingredients needed: no, Specialty equipment needed: no, Accurate time estimates: yes, Best for home chef skill level: novice, Taste/flavor: delicious, Family friendly: yes, specialty diet: no, How many recipes are unique: most, overall cookbook rating: love it

As someone who grew up baking, I am always excited to try a new baking cookbook. Bake Your Heart Out is one of the best baking cookbooks I have tested since I started my blog a few years ago. The recipes are well written, easy to follow, and contain helpful tips to help your recipe come out perfect. It is perfect for bakers of any level as you can choose some of the easier recipes or use your skills to take your baking to the next level.

I can’t wait to try even more recipes from Bake Your Heart Out. On my shortlist to try are: red velvet cheesecake bars, gingerbread cutouts, and my big fat fudge brownies. Let me know below which recipe you try first and what you think? 

Leave a Reply

Your email address will not be published. Required fields are marked *